
“I’ve heard it’s good to know how to use GitHub, but I have no idea where to start.”
If that sounds familiar, you’re not alone. GitHub is the world-standard platform for managing and sharing code, used by everyone from solo developers to large engineering teams.
This guide focuses primarily on Windows — the most widely used environment — and walks you through every step from installing Git to opening your first pull request, with clear illustrations for beginners.
- The difference between Git and GitHub, and why both are essential skills for engineers today
- Step-by-step instructions from environment setup to your first push
- The basic team development workflow using branches and pull requests

1. Before You Learn GitHub | Understanding the Difference Between Git and GitHub

Before diving into GitHub, let’s clarify one foundational point: Git and GitHub are two separate things.
In short, Git is software; GitHub is a service. Keeping this distinction in mind from the start will help you understand what each command does and how your data flows through the system.
Here is a high-level overview of how data moves:
- Changes made locally start in the Worktree (working directory)
git addmoves them to the Index (staging area)git commitsaves them to the Local Repositorygit pushsends them to the Remote Repository (GitHub)
Once you internalize these four stages, the purpose of each command will start to feel intuitive.
Git Runs on Your Computer; GitHub Is the Cloud Service Where Your Code Lives
Git is version control software that records and manages the change history of your files.
It runs entirely on your local machine without requiring an internet connection, continuously logging what changed, when, and by whom. Think of it as a dedicated “change history notebook” sitting right on your desk.
GitHub is a web service that lets you store and share the change history managed by Git in the cloud. It functions as a “cloud warehouse for code,” enabling you to back up your personal projects and collaborate with teammates.
The Difference in Roles Between Git and GitHub
| Item | Git | GitHub |
|---|---|---|
| Type | Software (runs locally) | Web service (cloud-based) |
| Primary role | Recording and managing change history | Storing, sharing, and collaborating on code |
| Internet connection | Not required | Required |
| Analogy | Your local “change notebook” | The “cloud warehouse” where that notebook is stored |
Git alone is sufficient for version control, but combining it with GitHub instantly adds real-world benefits: team sharing, automatic backups, and code review workflows.
How Mastering GitHub Can Impact Your Engineering Career
According to a survey published by Findy Inc. on CodeZine, only about 30% of engineers in Japan actively use GitHub.
Put another way, being proficient with GitHub is still a genuine differentiator in today’s job market.
Globally, the GitHub Octoverse 2025 report found that AI-related projects grew by 98% year over year, with TypeScript rising to become the most-used programming language on the platform.
As AI-assisted development becomes mainstream, GitHub sits at the center of that infrastructure.
(Sources: CodeZine, Publickey)
Practical Impact on Job Searching and Hiring
Hiring managers are increasingly checking candidates’ GitHub profile pages when evaluating engineers.
Your contribution history (the so-called “green squares”) and the code quality in your public repositories serve as tangible proof that you actually write code — something a résumé alone cannot convey.
Learning GitHub lets you build technical skills and a portfolio simultaneously, making it one of the most efficient investments you can make as a developer.
▼Related Reading
Wondering whether GitHub is truly required for your job search? This guide breaks it down by industry and role, with practical portfolio tips.

2. Before You Start Using GitHub | Complete Your Environment Setup

Getting started with GitHub requires a few preparation steps:
- Install Git and complete the initial configuration
- Create a GitHub account
- Set up SSH authentication
We’ll work through each step in order.
According to IPA’s 2024 Software Trends Survey, the use of version control tools is becoming a standard practice across software development teams globally.
Once your environment is set up, everything else becomes significantly smoother.
(Source: IPA)
Install Git and Configure It to Work with GitHub
You can download Git from the official site at https://git-scm.com/.
On Windows
Run the downloaded EXE file and click “Next” through the installer using the default settings. Installation is straightforward.
On macOS
The recommended approach is to install via Homebrew with brew install git.
After installation, open a terminal (Git Bash on Windows, Terminal.app on macOS) and run the following commands to complete the initial setup.
Initial Configuration Commands (Windows and macOS)
# Set your username
git config --global user.name "Your Name"

# Set your email address (use the same address registered with your GitHub account)
git config --global user.email "your.email@example.com"

# Verify your settings
git config --list
Your user.name and user.email will be recorded in every commit you make.
Use the same values you registered with your GitHub account. After running the commands, execute git config --list and confirm that the values you entered are displayed correctly.
Verify the Installation
# If a version number is displayed, the installation was successful
git --version
# Example: git version 2.44.0
Create a GitHub Account and Get Started with the Free Plan
Go to GitHub.com (https://github.com/) and click the “Sign up” button to create your account.
Enter your email address, password, and username, then verify your email with the confirmation code sent to your inbox. Registration is complete.
There’s no need to worry about needing a paid plan. The free tier includes nearly everything you need for personal development.
As you get started, be sure to follow GitHub’s official Terms of Service, and pay close attention to security practices — in particular, avoid accidentally pushing sensitive or confidential information.
What You Can Do on the Free Plan
| Feature | Free Plan |
|---|---|
| Public repositories | Unlimited |
| Private repositories | Unlimited (collaborator limits apply) |
| GitHub Actions | Up to 2,000 minutes/month free |
| GitHub Pages | Available |
Set Up SSH Keys to Connect to GitHub Securely
GitHub discontinued password-based Git authentication in August 2021, and SSH is now the current standard for authenticating with the platform.
SSH (Secure Shell) establishes an encrypted connection to the server. Once configured, you can push and pull without entering a password every time.
(Source: GitHub Docs)
SSH Setup Overview
The process takes three steps: ① Generate an SSH key → ② Register the public key with GitHub → ③ Verify the connection with a test command.
① Generate an SSH Key (Windows and macOS)
# Generate an SSH key (use the email address registered with your GitHub account)
ssh-keygen -t ed25519 -C "your.email@example.com"

# Press Enter to save to the default path
# Setting a passphrase is optional but recommended
② View the Public Key and Register It with GitHub
# Display the contents of your public key
cat ~/.ssh/id_ed25519.pub
Copy the entire string starting with ssh-ed25519 AAAA..., then go to GitHub’s “Settings → SSH and GPG keys → New SSH key,” give it a title, and paste the key to register it.
③ Test the Connection and Expected Output
# Test the SSH connection
ssh -T git@github.com
If you see the following message, your SSH connection is configured successfully. (Note: On your first connection, you may be prompted to confirm — type yes and press Enter to continue.)
Hi [username]! You've successfully authenticated, but GitHub does not provide shell access.If [username] is replaced by your actual GitHub username, you’re all set. If the message doesn’t appear, double-check that you copied the full public key without missing any characters.
3. GitHub Basics | Making Your First Commit and Push
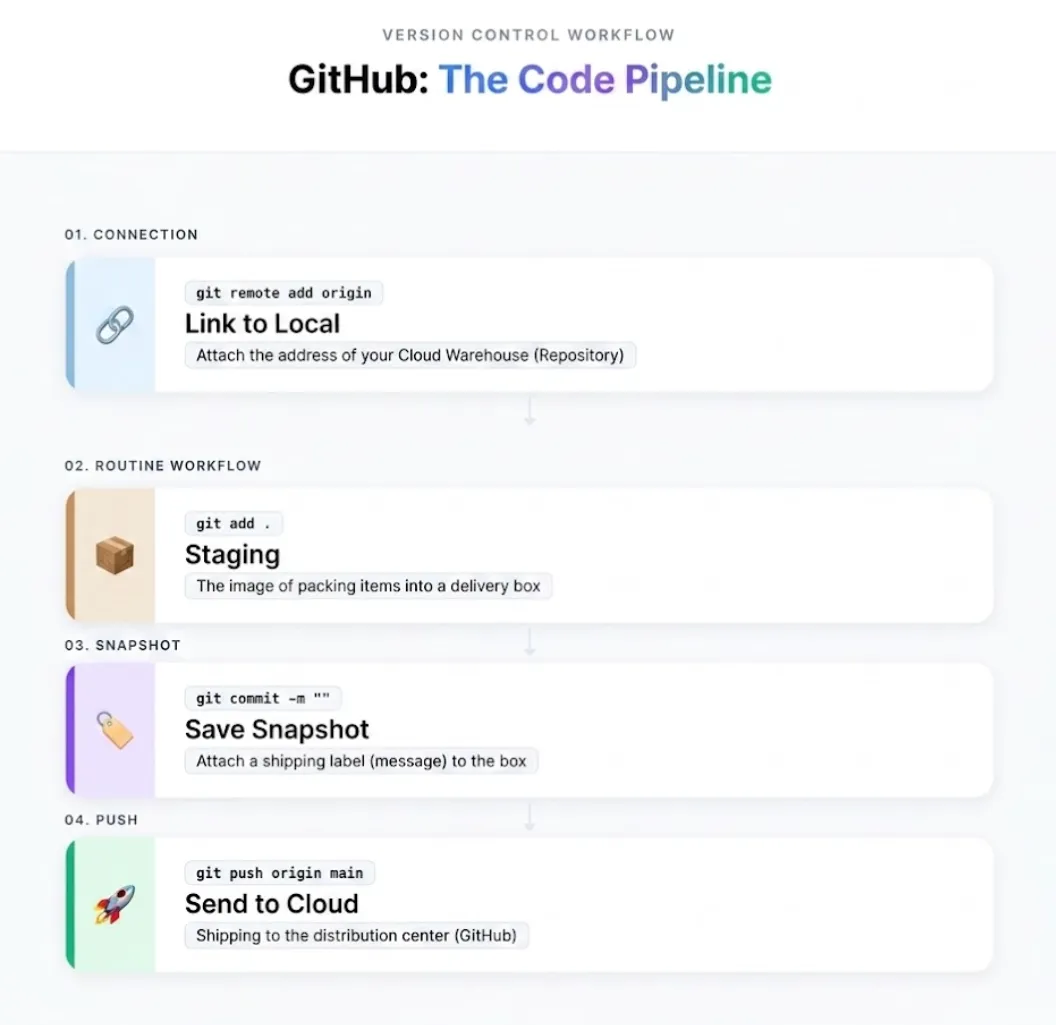
With your environment ready, it’s time to actually use GitHub.
The three commands you need to know are add, commit, and push. In short, they map to: “stage (hold temporarily) → save a snapshot → send to the cloud.”
Create a New Remote Repository on GitHub
A remote repository is your code’s “cloud warehouse” hosted on GitHub.
Log in to GitHub, click the “+” icon in the top-right corner, and select “New repository” to create one.
Repository Settings at Creation
| Setting | Options | Recommendation |
|---|---|---|
| Repository name | Any name you choose | Keep it short using alphanumerics and hyphens |
| Public / Private | Public / Private | Public for portfolio work; Private for practice |
| Add a README file | Checked / Unchecked | Checking it is the safer choice for beginners |
After creating the repository, click the green “Code” button, select the “SSH” tab, and copy the URL in the format git@github.com:username/repo-name.git.
You’ll need it in the next step.
Create a Local Repository and Link It to Your GitHub Remote
A local repository is a Git-managed workspace on your own computer. You can set one up in a new folder or an existing project folder.
Initialize Git in a New Folder and Connect to GitHub
# Create a working folder and navigate into it
mkdir my-project
cd my-project

# Initialize it as a Git repository
git init

# Link to your GitHub remote repository (use the SSH URL you copied)
git remote add origin git@github.com:username/repo-name.git

# Verify the connection
git remote -v
If running git remote -v displays the origin URL, your local and remote repositories are successfully linked.
Adding Git to an Existing Project
If you already have a working folder, simply navigate into it and run git init. The subsequent git remote add origin step is exactly the same.
The Basic Workflow: Using git add, commit, and push to Send Files to GitHub
To reflect your file changes on GitHub, run the three steps in order: add → commit → push.
What Each Command Does
| Command | Role (in brief) | Analogy |
|---|---|---|
git add | Stages changed files temporarily | Packing items into a shipping box |
git commit | Saves the staged content as a snapshot | Labeling the box with a description |
git push | Sends committed content to GitHub | Shipping the box to the warehouse (GitHub) |
# First, check the current state of your changes
git status

# Stage all changed files (use . to include everything)
git add .

# Commit with a short message describing what changed
git commit -m "Initial commit"

# Push to the main branch on GitHub
git push origin main
Example Output on Success
Branch 'main' set up to track remote branch 'main' from 'origin'.
Everything up-to-date
If you see Everything up-to-date, your changes have been successfully pushed to GitHub.
After pushing, make it a habit to open your repository page in the browser and visually confirm that your files appear there.
▼Related Reading
TypeScript is now the most-used language on GitHub. If you’re building your portfolio, understanding what TypeScript is and how it differs from JavaScript gives you a real edge.

4. GitHub in Practice | Joining Team Development with Branches and Pull Requests
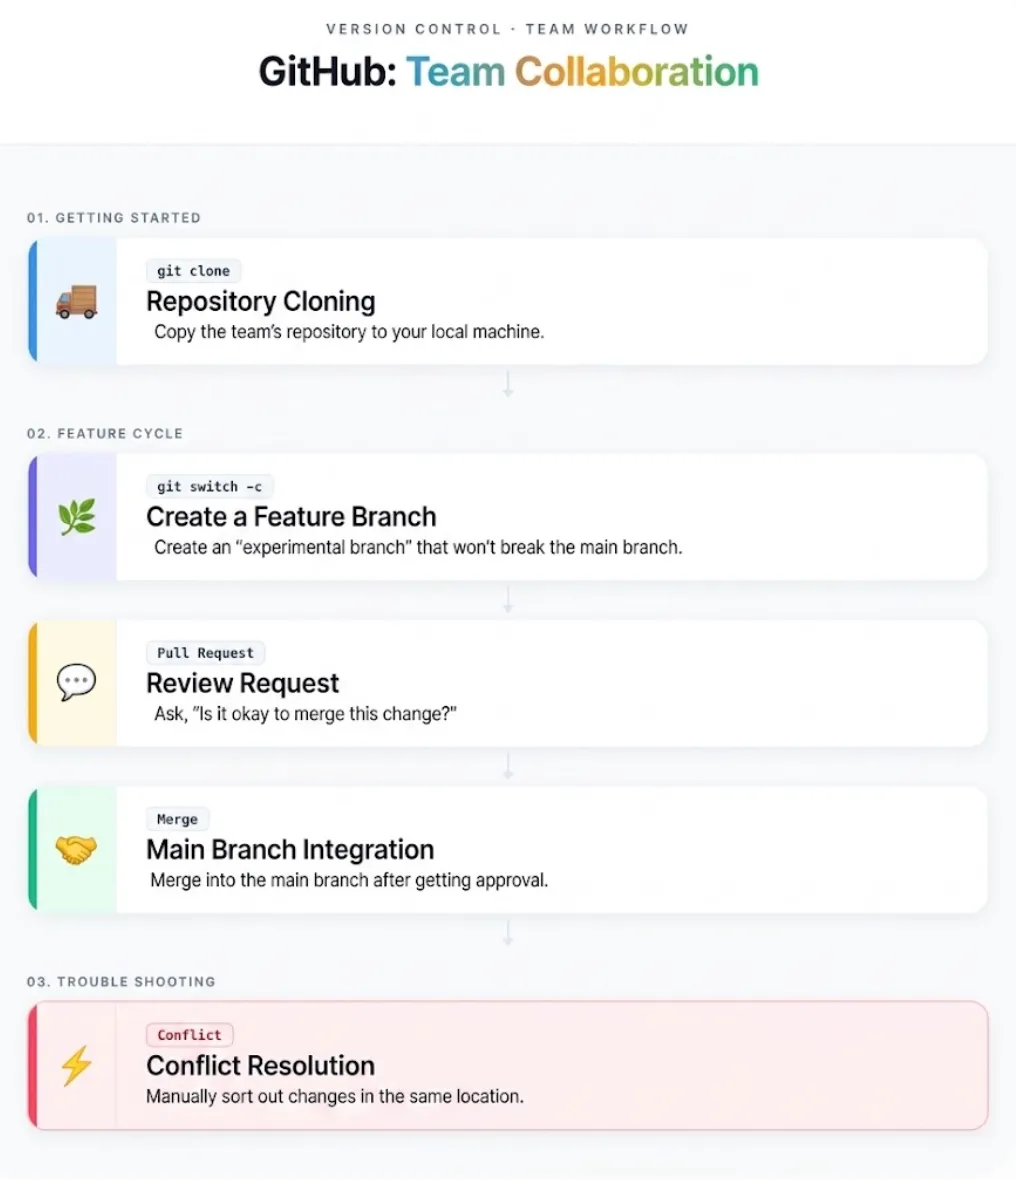
Once you’ve got the hang of working solo, the next step is moving into team development.
The ability to create a branch and open a pull request is a skill that hiring managers frequently look for alongside a strong portfolio.
This section covers the full team development workflow: cloning a team repository locally, creating branches, pushing changes, opening pull requests, merging, and resolving conflicts.
Clone a GitHub Repository Locally with git clone
When joining a team project, the first thing you’ll do is clone the team’s repository to your local machine.
The command for this is git clone. Obtain the SSH URL using the same method described in Section 3 (Code → SSH tab), then run the following:
# Clone the repository to your local machine
git clone git@github.com:username/repo-name.git

# Navigate into the cloned folder
cd repo-name
When cloning is complete, all files and the full change history are copied to your machine.
The git remote add origin configuration is set up automatically, so you can push and pull right away.
Create and Switch Branches to Safely Manage Changes in GitHub
A branch creates an isolated “working copy” where you can experiment without affecting the main line of development.
In team projects, directly modifying the main branch is generally not allowed. The standard practice is to create a dedicated branch for each new feature or bug fix.
Commands for Creating and Switching Branches
# View the list of existing branches
git branch

# Create a new branch and switch to it in one command
git switch -c feature/login-form
Branch Naming Examples
| Type | Naming example |
|---|---|
| New feature | feature/login-form |
| Bug fix | fix/null-pointer-error |
| Refactoring | refactor/api-client |
Always follow your team’s naming conventions, but prefix-based names like those above are widely adopted across many real-world teams.
Push Your Changes and Open a Pull Request on GitHub
Once your work on the branch is complete, push it to GitHub and open a pull request (PR) to ask your team for a review.
Pushing the Branch
# Stage and commit your changes
git add .
git commit -m "Add input validation to the login form"

# Push the working branch to GitHub
git push origin feature/login-form
After pushing, open your repository page on GitHub and you’ll see a “Compare & pull request” button. Click it to go to the PR creation screen.
What to Include in Your PR Description
- What changed: Describe the change (e.g., “Added input validation to the login form”)
- Why it changed: Explain the reason (e.g., “To prevent API requests from being sent when required fields are empty”)
- How to verify: Tell reviewers what to check (e.g., “Please confirm that an error message appears when the form is submitted with blank fields”)
A pull request is more than a vehicle for delivering code changes — it’s a communication channel where you tell your team how to read and evaluate your work.
A clear, thoughtful description improves the efficiency of the entire team’s development process.
Merge on GitHub After Review and Delete the Branch
Once a reviewer approves the PR, merge it to bring the changes into the main branch. GitHub’s PR screen lets you choose the merge method.
Comparing Merge Methods
| Merge method | Characteristics | Best suited for |
|---|---|---|
| Merge commit (recommended) | Preserves branch history and creates a merge commit | Beginners; when you want to retain full history |
| Squash and merge | Combines multiple commits into one before merging | When you want a cleaner commit history |
| Rebase and merge | Replays commits on top of main for a linear history | Advanced users who prefer linear history |
For beginners, Merge commit is the recommended choice. It preserves the full context of the branch, making it easy to trace what was done, when, and from which branch.
Cleaning Up After a Merge
# Switch to main and pull the latest changes
git switch main
git pull origin main

# Delete the branch you no longer need
git branch -d feature/login-form
Merged branches can also be deleted directly on GitHub using the “Delete branch” button on the PR page.
Leaving stale branches around clutters your repository, so make branch cleanup a routine habit after every merge.
How to Resolve Conflicts Without Stopping Your GitHub Workflow
A conflict occurs when multiple people have edited the same part of the same file in different ways, and Git cannot determine which version to keep.
It sounds intimidating, but a conflict is simply Git telling you where the collision happened. Stay calm and follow the steps below — it’s entirely manageable.
What a Conflicted File Looks Like
<<<<<<< HEAD
Content from the current branch (your changes)
=======
Content from the branch being merged (the other person's changes)
>>>>>>> feature/login-form
Three Steps to Resolve a Conflict
| Step | Action |
|---|---|
| ① Identify the conflict | Run git status to see which files have conflicts |
| ② Edit the file manually | Delete the <<<<<<< through >>>>>>> markers and keep only the content you want |
| ③ Recommit | Run git add and git commit after editing |
# Recommit after resolving the conflict
git add .
git commit -m "Resolve merge conflict"
git push origin feature/login-form
Resolving Conflicts Visually with an Editor
Editors like VS Code highlight conflict markers and provide “Accept Current Change / Accept Incoming Change” buttons, letting you resolve conflicts visually with a single click.
If you’re not yet comfortable with the command line, taking advantage of your editor’s built-in conflict resolution tools is a great approach.
▼Related Reading
Familiar with branches and pull requests? The next step is understanding how software engineering career paths work in Japan — from entry-level roles all the way to executive positions.

■日本でエンジニアとしてキャリアアップしたい方へ
海外エンジニア転職支援サービス『 Bloomtech Career 』にご相談ください。「英語OK」「ビザサポートあり」「高年収企業」など、外国人エンジニア向けの求人を多数掲載。専任のキャリアアドバイザーが、あなたのスキル・希望に合った最適な日本企業をご紹介します。
▼簡単・無料!30秒で登録完了!まずはお気軽にご連絡ください!
Bloomtech Careerに無料相談してみる
5. Advanced GitHub | Boosting Development Efficiency with Copilot and Actions
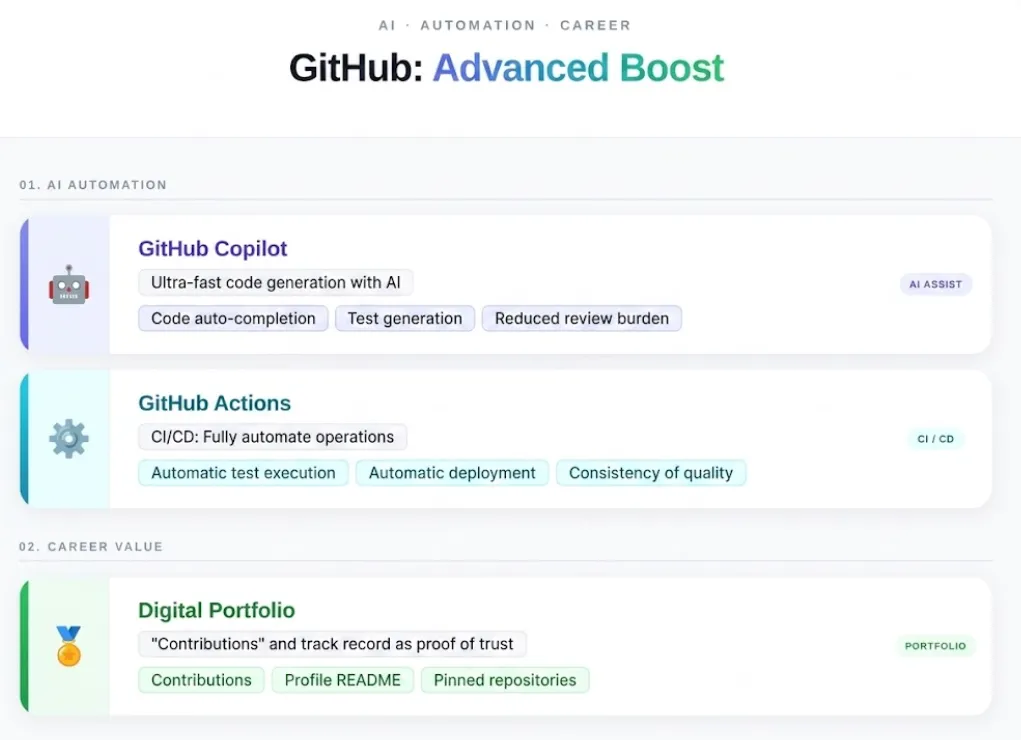
Once you’ve mastered the basics, let’s introduce two powerful tools: GitHub Copilot and GitHub Actions.
According to the GitHub Octoverse 2025 report, AI-related projects grew by 98% year over year, with TypeScript rising to the top as the most-used programming language. It’s worth knowing the basics of both tools.
(Source: Publickey)
Get Started with GitHub Copilot and Let AI Handle Code Completion
GitHub Copilot is an AI-powered coding assistant developed jointly by GitHub and OpenAI. Type a comment or a function name and it automatically suggests or generates the next lines of code.
Key Features and Free Tier of GitHub Copilot
| Item | Details |
|---|---|
| Free tier (Copilot Free) | 2,000 code completions per month; 50 chat interactions per month |
| Supported editors | VS Code, JetBrains IDEs, Vim, and other major editors |
| Primary use cases | Code completion, test code generation, generating functions from comments |
How to Install It in VS Code (Overview)
Search for “GitHub Copilot” in VS Code’s Extensions Marketplace, install it, and sign in with your GitHub account. That’s all it takes to get started.
Beyond faster coding, one of the most valuable real-world benefits is reduced review burden.
When AI generates test code and boilerplate, human reviewers can focus their attention on logical correctness rather than routine checks. For more details, see the related article “How to Use GitHub Copilot.”
Automate Testing and Deployment with GitHub Actions
GitHub Actions is GitHub’s built-in CI/CD feature that lets you automatically run tests every time you push code.
Create a .github/workflows/ folder in your repository, add a YAML file, and it’s ready to run.
Minimal YAML Example (Automated Testing for Node.js)
name: CI

on:
  push:
    branches: [ main ]
  pull_request:
    branches: [ main ]

jobs:
  test:
    runs-on: ubuntu-latest
    steps:
      - uses: actions/checkout@v4
      - uses: actions/setup-node@v4
        with:
          node-version: '20'
      - run: npm install
      - run: npm test
Save this YAML as .github/workflows/ci.yml and tests will run automatically whenever you push to main or open a pull request.
If a test fails, a red status badge appears on GitHub, letting you catch problems before they get merged.
Key Benefits of Adopting CI/CD
- Prevents bugs caused by missed tests from reaching production
- Eliminates the overhead of manual deployment steps
- Frees reviewers to focus on code quality rather than whether the build passes
For more details, see the related article “Getting Started with GitHub Actions.”
▼Related Reading
GitHub Actions is closely tied to DevOps workflows. If you want to understand the bigger career picture — and what a DevOps roadmap looks like for engineers working in Japanese companies — this guide is a great next read.

Use Your GitHub Profile as a Portfolio for Job Hunting
Your GitHub profile page functions as a “living portfolio” for engineers. There are three main elements that hiring managers pay attention to.
GitHub Profile Elements That Catch a Recruiter’s Eye
| Element | What it shows and why it matters |
|---|---|
| Contribution graph (green squares) | Shows at a glance whether you code consistently. A steady stream of green squares signals that you’re an engineer who stays hands-on as a habit. |
| Profile README | Lets you introduce yourself, list your tech stack, and share contact info. Create a repository with the same name as your GitHub username and add a README.md — it will appear automatically on your profile. |
| Pinned repositories | You can pin up to six repositories to the top of your profile. Featuring your strongest work here makes it immediately visible to anyone who visits. |
Simply continuing to use GitHub is itself proof of ongoing learning. You don’t need to build something spectacular — following the steps in this guide and accumulating a history of small projects and coding practice is more than enough to make a positive impression.
▼Related Reading
A strong GitHub portfolio pairs perfectly with a well-crafted engineer resume. Here’s how to write one that actually passes document screening at Japanese IT companies.

6. Conclusion | You Can Learn GitHub Step by Step, Starting from Zero
You don’t need to master every GitHub feature in a single day.
Completing your SSH setup and successfully making your first push is a significant milestone. From there, the path opens up to branch management, pull requests, and CI/CD.
By understanding the concepts as you practice each operation, the purpose of every command will naturally sink in. Work through the steps in this guide one at a time, without rushing.
■ Take Your GitHub Skills Into the Japanese Job Market
You’ve taken the first steps with Git and GitHub — now it’s time to turn that momentum into a real career opportunity. BLOOMTECH Career for Global helps engineers already living in Japan, with Japanese proficiency at JLPT N2 or above, land roles at leading IT companies. From resume review to interview preparation, our bilingual advisors support you every step of the way.
▼Contact BLOOMTECH Career for Global here